Easy prototyping when using APEX DA triggeringElement
The Background
This blog post is drill down follow-up of a feature I talked about in my KScope14 presentation “Go-Go Gadget: Learn About Inspectors”. In that presentation I explained how using the $0 feature in most modern DevTools and Inspectors can be really useful while prototyping Dynamic Actions (DA) in APEX that can be triggered by many elements on a page.
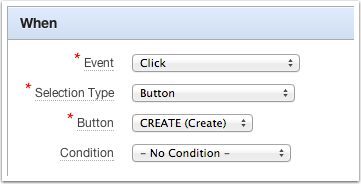
Often, DA act on some user input or user action. For example, when an item value changes, a mouse click, a key press, etc… The triggering element is the element or elements that causes the DA to fire. When the DA is defined on an Item or Button, it’s very clear which element has just caused the DA to run. We only have one element on the page to deal with. However, when the DA uses a jQuery Selector for the selection type it is not uncommon to have multiple DOM objects on the page that could be our triggering element.
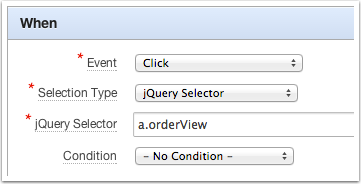
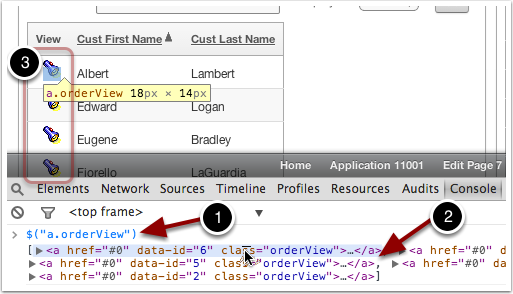
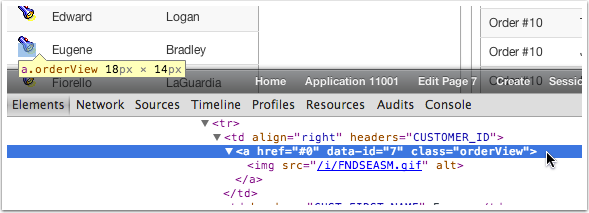
For the jQuery Selector example above, if we were to run the selector $("a.orderView") from the console we would see a DOM element for each match. If the report had 20 rows on the screen, you would get 20 elements back.
The DA architecture provides us with an attribute called triggeringElement. Your JavaScript code running in the context of the DA, can simply use this.triggeringElement to reference the actual DOM object of the element that fired the action.
The Example
Lets write a DA that highlights each customer row as the user clicks on them. The highlight will be achieved by adding a class of “current” to all the TD elements of the row that contains the flashlight that was clicked.
Chances are you’re going to need to give things a few tries before you narrow down the code you need. I say to you that all this work can be done from console using $0
Getting to the Point
Open you favorite inspector (I’ll use Chrome for these examples), inspect one of the a.orderView anchors.
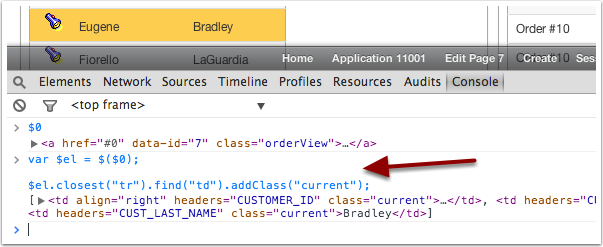
Then go to the console and type $0
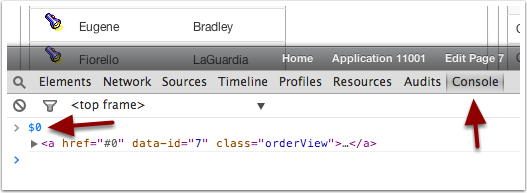
That’s right! $0 is a reference to the last highlighted or selected element in the inspector. We can now prototype our JavaScript code right from the Console using $0 in place of this.triggeringElement. When we’re done, we swap $0 for this.triggeringElement and place the code in the DA.
Working Through The Example
There are many ways to achieve what we want here. We want to add a class to all the TD elements on the row where our element was clicked. I propose we walk the (DOM) tree up to the TR element, then select all the TD and add the “current” class.
So try these in the console:
var $el = $($0);

$el.closest("tr").find("td").addClass("current");
Line 1 creates $el as a jQuery object to our element.
Line 3 finds the closest TR element. Then we find all children “td” elements for that “tr” and we add the “current” class to all of them.
I’ll admit, I didn’t get that short and sweet line of code on my first attempt. However, the beauty is that I could work through it, live on the page, right from the console by using $0.
Then, the final thing to do is to replace $0 for this.triggeringElement and create a True “Execute JavaScript Code” Action to our DA:
var $el = $(this.triggeringElement);

$el.closest("tr").find("td").addClass("current");
We’re not quite done. At this time, the rows highlight, but they never “turn off”. We’ll add one more simple line that will remove all the “current” classes from the TD elements. The final code, will look like this:
var $el = $(this.triggeringElement);

$(".current").removeClass("current");
$el.closest("tr").find("td").addClass("current");
TL;DR
Prototype your JavaScripe code in the console using $0 and then replace $0 with this.triggeringElement.
Here’s a working demo.



I didn’t know about $0, that’s pretty sweet. However, when testing my code for a dynamic action where using a selector, I usually do it by using .eq() to select an element from the array of elements returned. eg $(“a.orderView”).eq(0) for the first element.
This also makes sure you’ve double-checked the selector you’re about to use :-) But this article probably is meant to tie in with the browser inspection tool presentation – and it’s still a very good tip!
Hi Tom, yes you’re correct, this was to show the feature during the presentation. I like the .eq() approach. I can definitely see myself using both, thank you for sharing.
Excellent explanation. Note to self: remember to wrap $0 with $()!
Sometimes you’ll only need a reference to the DOM object, for those cases you don’t need $(). Wrapping with $() turns it into a jQuery object. So if you want to operate with jQuery on the element, then yes. :)
Hi Jorge, very useful tip, thank you for sharing it.
A small suggestion: instead of removing and adding the class, you could use the toggleClass method, which automatically adds or removes a class depending if it is present or not (i.e., $el.closest(“tr”).find(“td”).toggleClass(“current”);)
http://api.jquery.com/toggleclass/
Hi Erick, you bet, that’s a good suggestion. At the time, I was more focus on the $0 functionality. Ha! Thanks!